Format of IBM PC Disks
An IBM PC 5.25” disk is divided into 40 tracks, numbered 0 to 27 (in hex). Each track normally has either 8 or 9 sectors, depending upon which DOS was used to create it. Each sector contains 512 bytes of data (although this can be changed and often is with protection schemes). Any disk can also use either 1 or both sides, resulting in up to 80 tracks of data for a 3.5” disk. Because the disk controller needs to be able to find any given sector of data very quickly, each sector is given a unique ID containing all the above information.
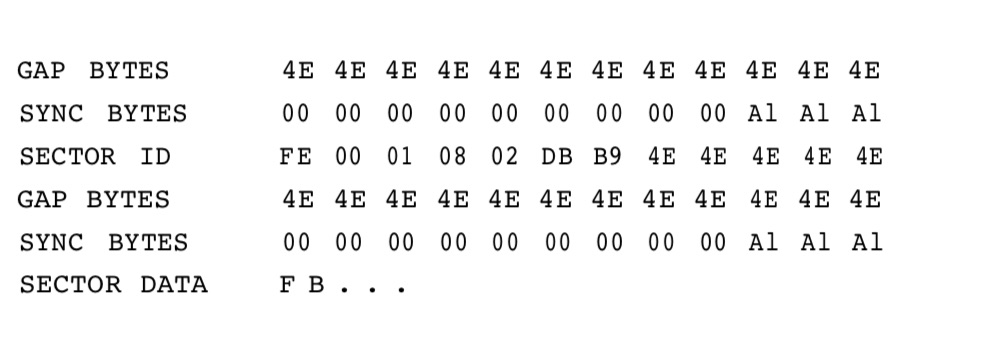
On an even lower level, the floppy disk controller needs to be able to distinguish IDs from data. For example, you might have a pattern of data in a sector that could also be interpreted as a sector ID. Special kinds of bytes are therefore needed to eliminate this potential confusion. These are called sync bytes. There are actually two kinds of sync bytes that you can see when you look at a track: a sequence of 00 bytes followed by three Als. The Als are a special kind of byte that have what is called “missing clocks.” All this means is that they violate the normal recording rules. The editor will highlight these bytes to make them easier to find.
Note: You may see other highlighted bytes, especially right after sector IDs and data fields. These are normal and are the “splice points” caused by writing a data field. Because these splice points produce a few bytes of unreliable data, it is likely that they, too, will violate the normal recording rules and will therefore be highlighted by the editor.
Whenever you see the three highlighted Als in a row, you know one of two things is next: the sector ID or the sector Data. If it is an ID, the next byte, often referred to as an “address mark” will be a FE. If it is the data portion of a sector, it will be a FB.
If you take a look at a standard disk with the editor, you will see an equal number of both IDs and Data fields on the disk. In fact, they come in pairs, with the short ID field preceding each sector’s data.
You should also see one last type of byte on the disk. Like sync bytes, they come grouped together, but serve a different purpose. They are called “gap” bytes and are usually 4Es. As their name suggests, they form a gap or buffer around the ID and data portions of a sector. They are needed to provide just a little bit of extra space in case something is written at not quite the right time. For example, your drive may be spinning slightly faster or slower than the drive that originally formatted the disk. Without gap bytes to take up the difference, one sector could partially overwrite another, making at least one of them unreadable.
In summary then, a standard sector looks something like this:
After the FB is the 512 (200 hex) data bytes stored in the sector. If the track contains a text file filled with ASCII characters, you can see them on the right side of the display in the editor. You should be able to recognize some of the data you have stored.
After both the ID and Data are a couple of bytes called CRCs. These special bytes form a type of check on the data that verifies that it is OK. Whenever you see the ominous message “Error Reading Drive n“ from DOS, it is actually telling you that the CRC bytes didn’t match what it expected for that sector. Both IDs and Data fields have CRC bytes.
The editor will automatically recalculate them for you if you change any of the data in a data field. Here’s how to read the sector ID information: Immediately following the FE are 4 bytes. These store the Track, Side, Sector, and Size information described earlier. In the above example, these bytes are 00 0108 02. This means that it is the sector ID for sector eight on track 0, side 1. The last byte also tells us that it is a normal 512 bytes sector. Here’s a simple table you can use to determine the size from the size byte in the ID field:
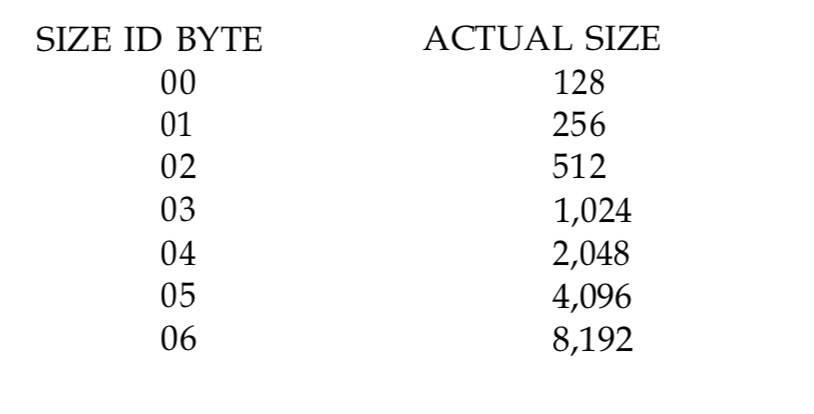
Actually, only slightly more than 6,000 bytes can fit on a track, so a size of 06 is impossible, although it is used in the IDs on some protected disks. Sometimes, the sector ID will say the sector is one size when in reality it is another. This is done only to allow the standard disk controller to read special data that might be imbedded in gaps (as part of a protection scheme).
You can use the editor’s Inspect command to do a lot of the work of decoding sector IDs for you. Inspect looks through the entire track in memory, finds and decodes all the sector IDs it finds. It will even tell you if there are any errors in the ID or Data fields (usually a dead giveaway of either a protection scheme or damaged disk). While this overview has been short, it should at least get you started using the editor. If you are curious enough to want to use it, the best way to start is to try it out on a standard disk. If your experimentations will include writing to a disk, make sure it is not one with important data or programs.